I bought a 1979 Chinon CM-4 film camera in Tijuana. Film is expensive, so before wasting a roll I decided to learn exactly how this machine works — by taking apart its specs, one line at a time.
So here is my three step plan
- Understand what I really have in my hands. Michael Butkus created a comprehensive document that covers the details and specifications of the Chinon CM 4. My main goal with this document (aside from knowing what every button does) is to understand the specs and know exactly how every aspect influences the photos captured.
- Make sense of the numbers on my lens. I was hoping that lenses would make sense by themselves—the only easy part is to make it focus and unfocus—so at least knowing what my lens in particular can do is a must. I’m also curious about how optics and the actual process of taking a picture work.
- Take photographs. I’m doing all of these steps just to know which technical skills I’m lacking. Once I have the theory, I can start putting everything into action by taking interesting photographs.
My Camera
Here are some pictures of the camera I bought (they were taken with an iPhone, so chill).
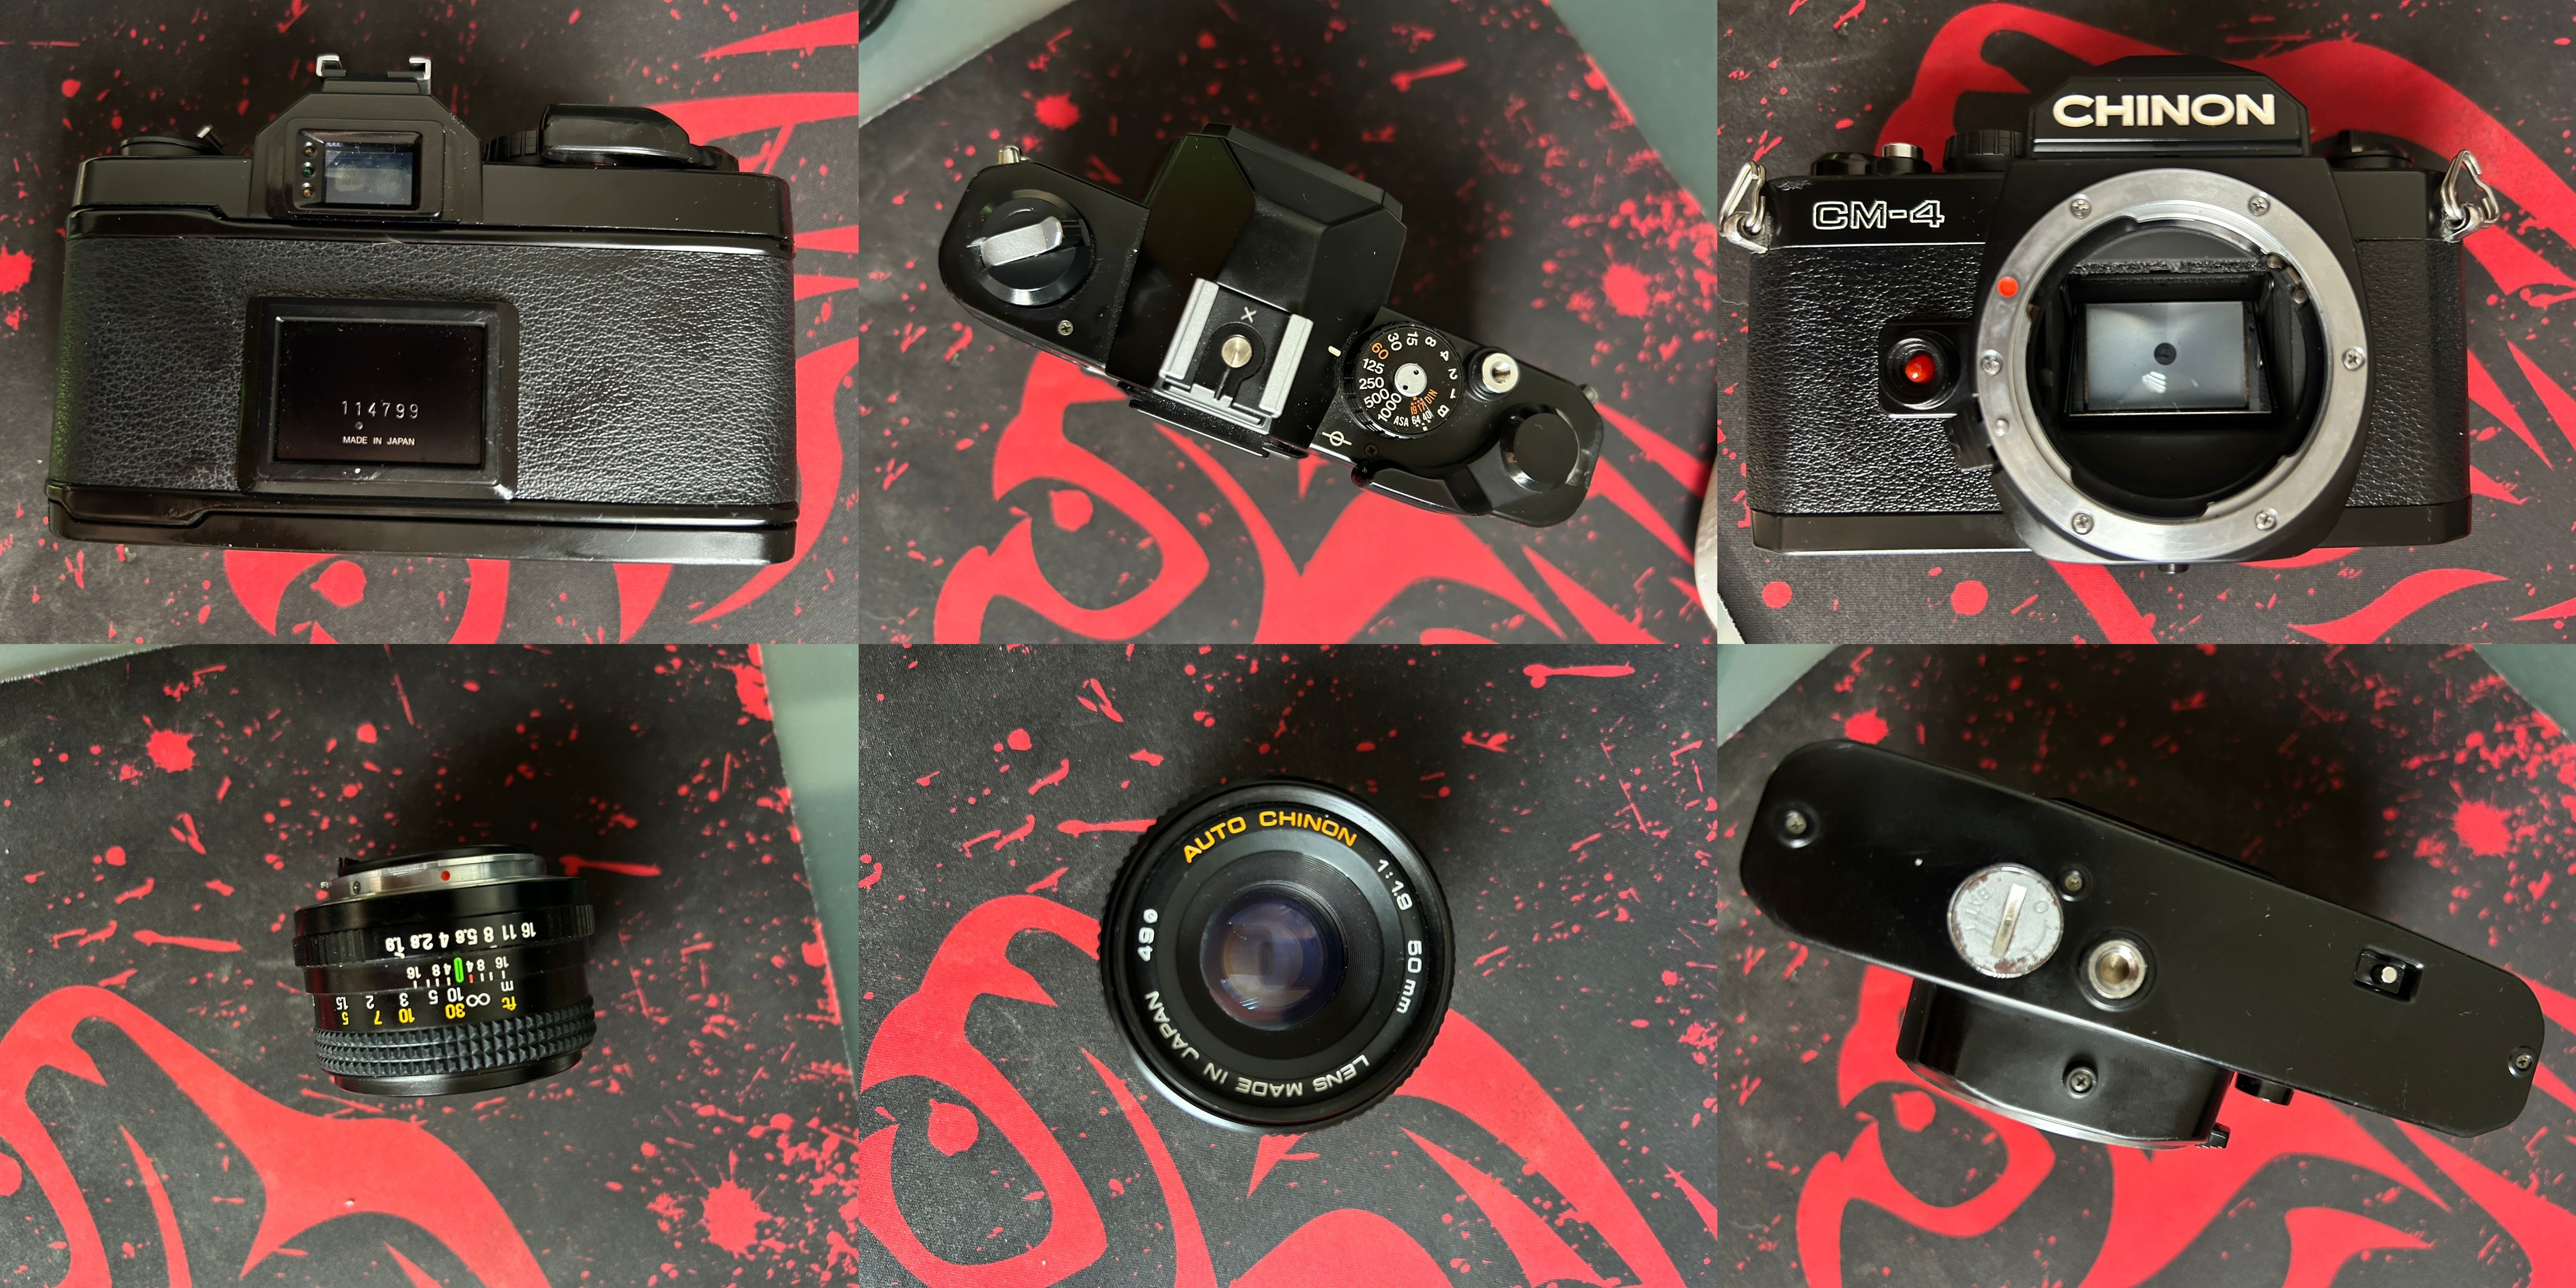
As you can see by the big labels at the front view of the camera, it is a Chinon CM-4. Chinon was a small Japanese maker of SLRs in the ’70s. In 2004 Kodak bought them, but in 1979 this was just another independent company making clever machines.
This camera specifically started to be fabricated in 1979, and I wasn’t able to find much information on when it was discontinued.
It has a brother called the CM-4S, which only differs by having a self-timer added. I don’t really know what it is, but I’m looking forward to finding out.
And yeah, I think that is really all the history that we need to know about this camera.
Specification
There is this guy called Michael Butkus who created a website for manuals for old cameras, and of course, he has a manual for the Chinon CM-4. This is right now the holy grail for understanding what I have in my hands.
So let’s start by analyzing each spec according to the document:
What 35mm SLR with an LED Meter Really Means
Type: 35 mm SLR compact camera with LED type light measuring system.
Let’s break down the whole sentence.
35 mm refers to the film that can be used with this camera. In the metric system, 1 millimeter is 1/1000 of a meter or 0.1 centimeters (or about 1.38 inches). This is exactly the measurement of the film from top to bottom; you can even use a ruler to verify that.

SLR stands for Single Lens Reflex, which is a type of camera design that means you look through the same lens that you take the picture with. There are other types like Rangefinder, which has a separate optical window for seeing the target. Here is a diagram of a digital SLR, but the same concepts apply here too.

Since the light bounces from the prism into the viewfinder, you are seeing exactly how the picture will look. This avoids parallax errors, which are the kind of errors that arise when there is a difference between what you see and what the camera captures. This is also known as TTL or Through The Lens viewing.
And now, the final part: LED type light measuring system.
This refers to this part on the back of the camera:

It’s the three LEDs next to the viewfinder. They are three colors, each with its own meaning: red for overexposed, green for correct, and yellow for underexposed. So let’s take a look at what exposure actually is.
Exposure basically involves three different things:
ISO – The greater the ISO the greater the sensitivity, faster films need less light for the same exposure. Film is created with a certain ISO so there is no way to change that; the greater the ISO, the brighter the image will be, but also a lot of grain (known as noise in digital cammeras) will be introduced.

Aperture – This controls the amount of light that the lens receives inside itself. This is used for controlling the depth of field, so you can blur the background.

Shutter speed – How fast the shutter opens up to allow light to enter the film. This can also be used for controlling motion blur.

So basically, for the light meter to work, it has an independent sensor that measures light, checks the ISO, aperture, and shutter speed, and gives you a preview when you half-click the shooting button, telling you if it’s too much light, too little, or the right amount.
Why 35mm Film Produces 24×36mm Photos
Picture Format: 24 x 36 mm.
35mm film somehow makes 24×36mm photos. The trick? The film runs sideways Obviously, it’s because this is done sideways, as shown in this picture:

Consequently, you ask yourself, why 35mm? Historically, before film, still photography plates were the norm, and Kodak sold 70mm plates. But a guy named Edison with his pal Dickson wanted to take more pictures, so they cut them in half, doubling the amount of pictures they could take. Why did it stay? Larger film is more expensive and smaller will look more grainy, especially in cinemas. And since equipment for manufacturing and distributing is expensive, standardization was needed. Basically, it was the right compromise at the right time.
Film is exactly where the magic happens; the camera is just a dark box that lets light enter for a tiny moment. Black and white film consists of a clever combination of chemicals into layers that, when exposed to light, will modify silver and create a negative of the image you just captured. For color film, it’s a bit more complex, but the same principle applies—it has more layers combining dye and silver.
We generally use the term grain to refer to the silver that makes up the photo. The more sensitive the film is, the bigger those grains will be, and this is why film photos have little imperfections. These grains can also be linked to ISO—the greater the ISO, the greater the size of the grain.
The revelation of film, also known as development, is also a chemical process that goes through a bunch of chemicals sequentially:
- Development is also the name for the first step; it’s for stabilizing the silver. If it stays too long, it can ruin the image by augmenting the grain, losing details, and creating excessive contrast.
- Stop bath – Stops these chemicals from developing by using more chemicals.
- Fixing – Removes all the unexposed silver, and from now on it is no longer light sensitive.
- Washing – Lastly, we wash the chemicals.

In theory, you can do this; kits are for sale for developing color and black and white film, but it can be extremely toxic if you are not careful. I think it’s something I’m not really interested in, just because of the risk it implies.
This is why you should never open the back of my camera when it’s loaded—it will expose the film to light and fog those frames. Also, if you notice, you can’t reshoot in the same way as in digital; it will superimpose both pictures. Actually, I think when loading the first film into my camera, it actually got a bit exposed to light (sad).
Why the Mirror Slaps — and How Engineers Made It Shockless
Mirror: Large, quick return, shockless system.
Once light passes through the lens, it reaches the reflex mirror. Its job is to direct light up through the prism to the viewfinder, letting you see exactly what the camera will capture.

As shown above, the mirror sits in front of the film. When you press the shutter button, the mirror flips up, allowing light to hit the film and trigger the chemical reaction that records the image. Early cameras kept the mirror hidden when film wasn’t loaded, so you couldn’t see through the viewfinder until you advanced to the next frame. The quick return system was invented so the mirror would immediately return to its position after a shot, restoring your view.
Because the mirror moves rapidly before the shutter opens, older cameras produced a noticeable vibration (also known as slap) that could cause motion blur at slower shutter speeds. A shockless system uses springs and cushions to absorb this impact, minimizing vibration.
A larger mirror lets more light reach the prism, resulting in a brighter, clearer viewfinder image.
From Cloth Curtains to Compact Metal Blades: The Seiko Shutter
Shutter: Seiko MFC metal focal plane shutter.
The shutter is the part of the camera that opens to let light hit the film and capture an image. The one in this camera looks like this:

Seiko, a Japanese manufacturer now known for watches, built these shutters with a reputation for engineering and precision.
MFC stands for “Metal Focal-plane Compact.” Metal is specified because early cameras used cloth curtains; metal shutters are more durable, consistent, and capable of higher speeds. Here’s a camera with a cloth curtain:

Focal-plane means the shutter sits right in front of the film inside the camera body, enabling faster shutter speeds. It exposes the film from top to bottom:

An alternative is the leaf shutter, which is built into the lens near the aperture. Leaf shutters are bulkier and more complex, but produce less vibration and capture images in a circular pattern from the outside in:

Early focal-plane shutters were large, gear-heavy, and used cloth curtains, limiting how compact cameras could be. By the late 1970s, manufacturers like Seiko refined shutters into smaller, lighter modules, making mass production and standardization possible.
From 1 Second to 1/1000 of a Second to Freeze Time
Shutter Speeds: 1 sec. - 1/1000 sec., “B”.
Shutter speed determines how long the camera’s shutter stays open, controlling how much light reaches the film. On this camera, you can choose speeds from 1 second (long exposure) to 1/1000 of a second (very fast).

There’s also a “B” (Bulb) mode, which keeps the shutter open for as long as you hold down the shutter release—useful for long exposures like night photography.
Slower shutter speeds (like 1s or Bulb) let in more light and can create motion blur, while faster speeds (like 1/1000s) freeze action and reduce brightness.

This range covers most situations for film photographers using ISO 100–400. For lower ISO (25–100), you’ll need slower speeds or Bulb mode to avoid underexposure. With higher ISO (800–1600), even the fastest shutter speed may let in too much light, risking overexposure.
How the Viewfinder Recreates Reality
Viewfinder: Fixed eye-level pentaprism, central split image with microprism collar and ground glass.
When photography was first invented, images were captured in a dark room with a tiny hole—this “camera obscura” (Latin for “dark chamber”) projected an inverted image onto a surface inside. Light travels in straight lines, so the scene outside appears upside down and reversed.

To let us see the image right-side up through the viewfinder, the camera uses a pentaprism—a five-sided prism that cleverly flips the light back to its original orientation. In this camera, the pentaprism sits at eye level, so what you see matches the scene in front of you.
Manual focusing aids help you get sharp images. The central split image is a circle in the middle of the viewfinder, divided in half; when the subject is in focus, the two halves align perfectly. Surrounding this is the microprism collar—if the image is out of focus, it appears grainy; when focused, the grain disappears.

All of this sits on ground glass, which has a matte texture created by tiny scratches. This diffuses the light, allowing you to see the image clearly from any angle—ordinary glass wouldn’t work, as it doesn’t scatter light.
Why the Scene Looks Smaller Through the Camera
Viewfinder Magnification: 0.87x (id 50 mm, 00).
Viewfinder magnification tells you how large the scene appears when you look through the viewfinder compared to seeing it with your naked eye. A value of 0.87x means the viewfinder image is 13% smaller than life-size. For comparison, here’s an original picture and another one scaled down by 13%:

This only affects what you see through the viewfinder, not the actual photo captured.
The parentheses specify the conditions for this specific magnification, it’s with a 50mm lens focused at infinity. Infinity might seem a bit abstract but basically it tells you that the lens is adjusted to receive from far away. The spec lists “00” instead of the infinity symbol, since not everyone could print it. This lets you compare magnification across different lenses.
Why You See Less Than What’s Captured
Viewfinder Visibility: 92%.
This specification tells you how much of the actual photo area you can see through the viewfinder. With 92% visibility, about 8% of the image—mostly around the edges—won’t be visible when you compose your shot.

Achieving 100% viewfinder visibility requires a larger, more precisely aligned prism and mirror, which adds weight and cost. Most SLRs offer 90–95% visibility to keep cameras lighter and more affordable.
How the Camera Helps You With Exposure
Exposure Meter: TTL, Center weighted full aperture system employing one silicon blue photo cell, 3 steps exposure indicator with 3 LEDs.
The exposure meter uses a silicon blue photo cell to measure light. When photons hit the silicon surface, they knock electrons loose, creating a small electric current proportional to the light intensity. Based on the ISO and aperture settings, the meter provides feedback on whether your shot will be overexposed or underexposed.
Here’s a visual example of underexposed and overexposed photos:

TTL (Through The Lens) means the meter measures the light that actually passes through the lens, so any lens changes or filters will affect the exposure reading.
Center weighted means the meter prioritizes light from the center of the frame over the edges.
A full aperture system keeps the viewfinder bright by measuring light at the lens’s maximum aperture. When you take a photo, the lens stops down to your chosen aperture only for the instant of exposure.
Unfortunately, the light meter on my camera doesn’t work. But since exposure is a physical process, I can use a phone app to measure light and determine the right settings.
Exposure Value: Turning Camera Settings Into Numbers
Exposure Range: EV+2 (F/1.9, 1 sec.) to EV+18 (F/16, 1/1000 sec.) - ASA 100 F/1.9 lens.
This is probably the most technical line, packed with symbols and acronyms.
As mentioned earlier, aperture is the part of the lens that controls how much light enters. Its unit is the f-stop, defined as:
f_number = f / d

where

f = focal length of the lens
d = diameter of the entrance pupil
Because lenses have multiple glass elements that bend light, we use the concept or optical center to refer to the point where light can be treated as if it bent once, usually referring to the last glass element. The focal length is the distance (in mm) from the lens’s optical center to the film.
Aperture blades create a circular opening that limits how much light passes through. The entrance pupil is the perceived diameter (in mm) of this opening, as seen through the front glass—since the glass can change how large the hole appears.
The larger the denominator in the f-number, the smaller the opening.

EV stands for Exposure Value. It represents a combination of aperture and shutter speed for a given ISO. EV 0–6 means a dark scene, EV 7–12 is normal daylight, and EV 12–18 is very bright.
To calculate EV for any settings, use:
EV_iso = log2((n^2) / t) - log2(iso/100)

or for ISO 100:

EV_100 = log2((n^2) / t)

where

iso = ISO number of the film
n = f-number
t = shutter speed in seconds
The light meter receives the EV from the sensor and compares it to this formula. If the measured value is higher, it’s overexposed; if lower, it’s underexposed.
Here, the spec means the light meter can measure correctly from EV 2 (f/1.9, 1 sec—the brightest setting) to EV 18 (f/16, 1/1000 sec—the darkest setting), using ISO 100 and a lens with a maximum aperture of f/1.9.
If you use higher ISO, the range shifts downward—the camera can meter darker scenes. This happens because, in the formula, higher ISO with the same settings lowers the EV.
For setting aperture manually, we can use the Sunny 16 rule, set your shutter speed as close as possible to your ISO, then choose the aperture based on lighting conditions:
- f/16 – bright sun
- f/11 – sun with a few clouds
- f/8 – mostly cloudy
- f/5.6 – overcast or outdoor shade
- f/4 – deep shade
For other situations (like indoors), it’s best to use a light meter.
From ASA & DIN to ISO
ASA Range: 25-1600 (DIN 15-33) with safety lock.
Previously, film sensitivity was measured using two standards: ASA (American Standards Association), mainly used in the US, and DIN (Deutsches Institut für Normung), used in Europe. ASA uses a linear scale, while DIN is logarithmic.
In 1974, the International Organization for Standardization (ISO) unified these standards. Today, we refer to film sensitivity simply as ISO—like ISO 100 or ISO 400. The higher the ISO number, the more sensitive the film is to light. Note that “ISO” here refers to the rating, not the actual ISO standard number.

Relevant ISO standards for film include:
- ISO 6: Black & white negatives
- ISO 2240: Color negatives
- ISO 5800: Slide (reversal) films
- ISO 2720: How meters and film speed are linked (exposure index)
The Chinon CM-4 supports film speeds from ISO 25 (low sensitivity, for bright conditions) to ISO 1600 (high sensitivity, for low light).
The safety lock means you can’t accidentally change the ISO setting. On this camera, you must pull the dial’s edge and rotate it to set your desired ISO.
How the Camera Syncs Light and Shutter
Synchronization: Strobe sync at 1/60 sec.
In photography, “flash” usually refers to any burst of light used to illuminate a scene, but technically, a “strobe” is an electronic flash unit that emits a very short, intense pulse of light.

Synchronization ensures the flash fires precisely when the shutter is fully open. This is called X-sync, which is designed for electronic xenon flashes (named for the gas inside the bulb). Other sync types, like M-sync or FP-sync, were used for older flash technologies.
On this camera, the fastest shutter speed for safe flash use is 1/60 second. Using a faster speed will only light part of the image. Slower speeds (below 1/60 second) allow more ambient light into the photo—this technique is called slow sync.
How the K-Mount Let Different Brands Share Lenses
Lens Mount: Chinon Universal Bayonet Mount.
This piece allows the lens to mount to the camera. It looks something like this:

Basically, this is a Penta K-Mount, a standard that was adopted by Chinon and the rest of the market for 35mm SLR cameras, so you can use a bunch of lenses by a bunch of manufacturers.
How Film Moves, Counts, and Rewinds
Film Advance: Single stroke in an arc of 130° with 25° stand off.
At the top right of the camera is a lever for advancing the film and cocking the shutter for the next shot.

To use it, swing the lever through a 130-degree arc. When at rest, the lever isn’t locked—it has 25 degrees of free movement, making it easier to grip and operate.
Film Counter: Automatically indicates number of exposures and resets to “S” when camera back is opened.
Next to the lever is a counter that shows how many shots you’ve taken. Opening the camera back resets it to “S” (start); after the first advance, it moves to 0.
Film Rewind: Folding crank type.
Film rolls typically have 24 to 36 frames, but the camera doesn’t track this. If you shoot past the end, you may overlap exposures.

When the roll is finished, rewind manually using the crank handle. It stays folded when not in use; lift it 90 degrees to rewind.
Lenses
Let’s start with the obvious question: why do we need a lens? We’ve learned that taking pictures with film is a physical reaction between light and chemicals inside a cleverly built black box. So, what’s the purpose of adding lenses?
Light can be described as rays for simplicity, but in reality, it behaves more like a wave. If you take a picture without a lens, the film receives light from all directions, overexposing the frame and creating a completely white image.
You might think, “Just use a tiny pinhole so only a small amount of light enters”—like the camera obscura mentioned earlier.
With a tiny pinhole (and nothing in between), everything is in focus, but you lose detail due to diffraction. Only a limited number of rays (or waves) enter, and you need to keep the shutter open longer. If you increase the pinhole size, the image becomes blurrier because rays overlap.

Using a curved glass (a lens) gathers much more light, bends it (refraction), and focuses it to a single point on the image plane, creating a sharp image.

This happens because the pinhole limits the light that enters, meaning it will loose some amount of information, while the lens bends it, mapping all light into a single point in the frame. But only one plane can be on focus with a lens because it can only bend the light from one distance perfectly at a time.
My Lens
By googling around, we can find that this is an Auto Chinon 50mm f/1.9

Let’s check the fron of the lens first
Auto Chinon: This was one of the most mainstream lens series in the 1960s–80s, paired with Chinon’s SLR cameras. “Auto” refers to the lens type—it maintains full exposure while focusing and composing, allowing all light to reach the viewfinder. When you take a picture, it mechanically adjusts the aperture to your chosen setting. This is different from older “preset” lenses, where setting the f-stop made the viewfinder darker.
50mm: As previously mentioned, the focal length is the distance from the lens’s optical center to the film. This is considered a “standard” or “normal” lens because it gives a field of view close to what the human eye naturally sees, making it very versatile.
1:1.9: This is the maximum aperture of the lens. In modern notation, it should be expressed as f/1.9. For this lens, the aperture diameter is 26.3mm. The notation is written as a ratio, where 1 represents a unit of focal length, which in this lens is 50mm.
49Ø: This is the diameter of the filter thread—the size of the spiral at the front of the lens. It specifies what accessory size (like filters) you can attach. You can still use larger filters with a step-up or step-down adapter ring.
Made in Japan: You don’t expect me to explain this one, right?
And finally let’s figure out what these crazy looking numbers around the lens mean.
Controlling the Actual Aperture
16 … 1.9
This is the scale the lens has for aperture, each known as full stop. Each succesive number halves the amount of light entering.
These numbers are not evenly spaced because depends on the area of the circle, so it involves the radius, meaning the diameter divided by 2, which ends up in the f-stop being multiplied by the square root of 2 to define its full stop.
How Far Can You Focus
ft m …
This is the focus distance scale, the green line will tell you (on meters and feets) at what distance your lense is focused. As previously mentioned the infinity mark means very far objects, which in practice for a 50mm lens is around 30-50 meters.
Depth of Field Helper
16 … | … 16
This is known as the DOF or Depth Of Field scale. The line at the middle specifies the focus point, meaning that objects at exactly that will be perfectly sharp. Because of optics, objects a bit in front or behind will also look sharp, this extra sharpness zone is the DOF.
In essence, this scale shows: “When you set the aperture to f/X, objects between Y and Z distances will appear sharp”.
Some of my Pictures
Seems like I loaded the film incorrectly and nothing was on them, so I hate my life right now. Let’s skip this part then.
Conclusion
By exploring my camera’s specs, I’ve learned how cameras work and gained insight into their evolution. It’s amazing how clever chemistry and engineering made it possible for anyone to capture moments, and in a time where everyone feels that was a long time ago.
If you’ve read this far, I hope you’re inspired to stay curious, explore new topics, google things around, use chatgpt as a mentor, and appreciate what we’ve achieved as humans. I may not become a photographer, but the process of learning and writing this blog has been incredibly rewarding.
I haven’t done anything impressive with my new camera yet, but at least I know my challenge is creativity, not technical knowledge.
To sum it up: The real lesson is that specs are a roadmap, whether it’s cameras, computers, or chemistry, manuals are underrated teachers.